I would like to present my idea how to protect the IoT. I’m aware that my design may contain some errors. It’s just my version.
The concept of ‘Internet of Things’, where many ‘things’ interact between each other, requires new model of security. I would like to propose my idea of using existing elements, which are reliable and widely used in today’s networks.
KEY ELEMENTS
There are three types of zones with different functionality:


ZONE MANAGER FUNCTIONALITY
GET VPN Client configuration:
OPEN QUESTIONS
OTHER EXAMPLES:
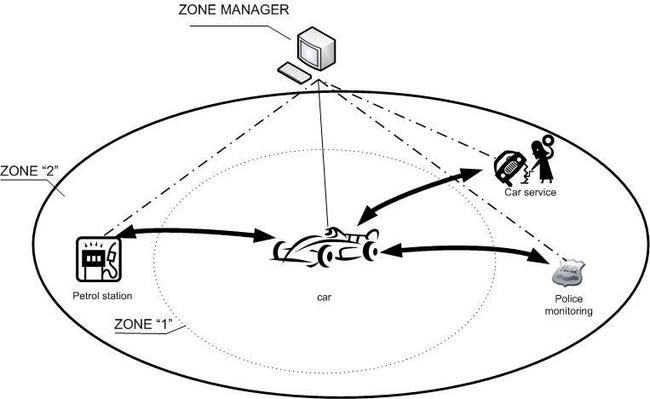
In above example we have the car in zone “1” as a trusted host and
secure connections with different partners: a petrol station, a car
service, police monitoring.

The concept of ‘Internet of Things’, where many ‘things’ interact between each other, requires new model of security. I would like to propose my idea of using existing elements, which are reliable and widely used in today’s networks.
KEY ELEMENTS
- Zone - a virtual area where different hosts are located and depends on the zone membership you can set up different types of secure connections.
- Host – a device with Internet interface and security features.
- GET VPN –Group Encrypted Transport VPN – a tunnel-less VPN technology that provides end-to-end security for network traffic.
- GET VPN Server/Key Server - responsible for maintaining security policies, authenticating the GMs and providing the session key for encrypting traffic. KS authenticates the individual GMs at the time of registration. Only after successful registration the GMs can participate in group SA.
- GET VPN Client/Group Member - registers with the key server to get the IPSec SA that is necessary to encrypt data traffic within the group. The group member provides the group ID to the key server to get the respective policy and keys for this group. These keys are refreshed periodically by KS, and before the current IPSec SAs expire, so that there is no loss of traffic.
- Zone Manager – a device which manages hosts and security connection, it plays also role as a DHCP server and wireless router.
- mini-IOS – special version of software for hosts with security features (GETVPN client).
There are three types of zones with different functionality:
- Zone “1” (figure 1) – this is the most trusted zone where hosts trust each other and can communicate freely (using secure connection).
- Zone “2” (figure 2)– this zone is half-trusted and defines the relationship between hosts in the zone “1” and external, designated partners. For one host in the zone “1” you can define multiple partners from zone “2”.
- Zone “3” (figure 3) – this zone covers the whole Internet and by default any host from the zone “3” can communicate with hosts from zone “1” and “2”. Once you define a new relation with host/partner from the zone “3”, the host is promoted to the zone “2”.
Figure 1: Zone “1”
Figure 2: Zone “1” & “2”
Figure 3: Zone “1”, “2” and “3”
- Wireless router- provides wireless connection for local hosts.
- DHCP server – for members of the zone “1” only.
- GET VPN – Key Server – manages all secure connections, all hosts in the zone “1” are GET VPN clients (Group Members) with pre-defined configuration. Based on IP allocated by DHCP server (or DHCP pool) Key Server updates predefined ACL (for matching interesting traffic).
- The repository of software (mini-IOS) for hosts from zone “1” – the upgrading process works like for Wireless Controllers and Access Points. The software is automatically downloaded by a host when the IOS versions of a host and a server are different.
- Negotiate security parameters with partners (zone 2) to secure connections with designated hosts (for example: a TV (zone1) has connection with TV-Service (zone2); a fridge (zone1) has connection with e-store you have chosen (zone2)).
- Connect to the wireless network (controlled and managed by the Zone Manager) – the DHCP server on the Zone Manager assigns IP for the client.
- From the Zone Manager console you approve members which can be in the Zone “1”.
- From the Zone Manager you provide ‘identity number’ required by GET VPN.
- From the Zone Manager you provide ISAKMP parameters required by GET VPN.
- Approved clients start process of joining to the Zone “1” – the Key Server automatically updates GET VPN configuration based on the IP allocated by the DHCP: ACL for interesting traffic. The DHCP server’s IP is taken to GET VPN client configuration (server IP).
crypto gdoi group GETVPN
identity number 12345 parameter to agree (manually)
server local
rekey algorithm aes 128
rekey address ipv4 103 parameter to agree (generated automatically from DHCP)
rekey retransmit 10 number 2
rekey authentication mypubkey rsa REKEYRSA
sa ipsec 1
profile GETVPN_PRF
match address ipv4 102 parameter to agree (generated automatically from DHCP)
replay counter window-size 64
address ipv4 10.0.0.1 parameter to agree (generated automatically from
interface setting)GET VPN Client configuration:
crypto gdoi group GETVPN
identity number 12345 parameter to agree (manually)
server address ipv4 10.0.0.1 parameter to agree (generated automatically from DHCP)OPEN QUESTIONS
- How to provide non-secure connections (Internet) for hosts like a mobile or a computer, by split-tunnel?
- One partner (zone 2) has been hacked and it has secure access to one host (zone 1). How to protect other hosts in the zone “1” against unauthorized access?
OTHER EXAMPLES:
Figure 4: Example of relation between one host in the zone “1” and few partners
Figure 5: City facilities example

Comments
Post a Comment